Configuring Google Contacts as a Telephone Book
You can set up your Google contacts as an online telephone book in the FRITZ!Box and use the telephone book in one or more FRITZ!Fon cordless telephones.
The FRITZ!Box telephone book and your Google contacts will be synchronized automatically so there is no need for double administration.
Configuring Google Contacts as a Telephone Book
Here is how to configure your Google contacts as a telephone book in the FRITZ!Box:
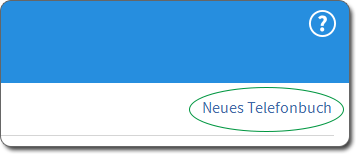
- Select "Telephony / Telephone Book" in the user interface.
- Click the "New telephone book" link.
- Enter a name for the telephone book, for instance, "Google Contacts".
- Enable the option "Use the telephone book of an e-mail account".
- Select the provider "Google".
- Only if FRITZ!Fon cordless telephones are registered with the FRITZ!Box: Under "Telephone Assignment", select the telephones with which you would like to use the telephone book.
- Click "OK" and wait until the sharing code appears:
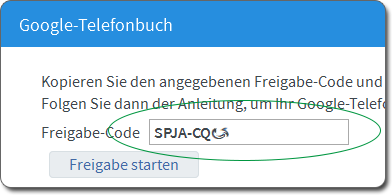
- Copy the sharing code and click "Start Sharing".
The "Log in with your Google Account" window appears.
- Enter the e-mail address and password of your Google account and click "Sign in".
- Enter the sharing code and click "Next".
- Click "Permit".
- Click "OK" in the FRITZ!Box user interface.
The telephone book is configured.
x
Selecting Google Contact Groups
If you have set up groups in your Google contacts, you can select individual groups for display in the FRITZ!Box telephone book:
- Set up your Google contacts as a telephone book in the FRITZ!Box according to the above instructions.
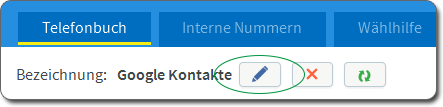
- Select "Telephony / Telephone Book".
- If you are navigating in a different telephone book, click the "Switch telephone books" link to select the Google contacts.
- Click the "Edit" button.
- Under "Show contact groups", select one or more groups to be displayed.
- Only if you selected multiple groups: First specify the group to which new telephone entries created in the FRITZ!Box are to be assigned.
- Click "OK".