Configuring Switching According to Schedule for a Socket/LED Lamp
You can configure various types of automatic switching for the socket and LED lamp. For switching on weekdays you can define different times for switching on and off on different days of the week. Multiple switching times per day can also be configured.
Automatic switching can either be configured for an individual Smart Home device or for a group of multiple Smart Home devices.
Example
The times when the socket is to be switched on or off can be specified in the schedule down to 15-minute intervals.
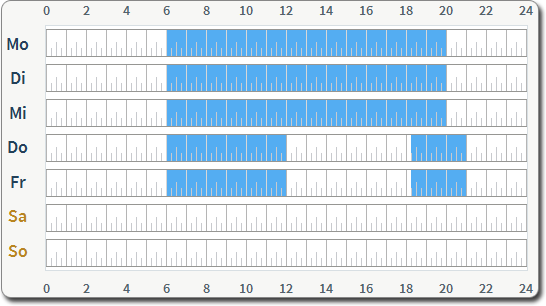
| Color | Socket status | Periods |
|---|---|---|
| Blue | switched on |
|
| White | switched off |
|
Rules
- You can define a maximum of 140 switching times. A switching time is every point at which "on" becomes "off" or vice versa.
Instructions: Configuring Switching for a Socket/LED Light
- Select "Smart Home / Device Management" in the user interface.
- Click on the "Edit" button
 for the desired Smart Home device.
 - Click on the "Switch Automatically" tab.
- Enable the "Schedule enabled" checkbox.
- Continue with the section "Specifying Switching Times".
Directions: Configuring Automatic Switching for a Group
For a new group:
- Select "Smart Home / Groups and Templates" in the user interface.
- Click on "Create Group".
- Select all of the devices that are to belong to this group and then click on "Next".
- Enter a group name and click on “Next”.
- Click on "Configure Group Now".
- Enable the checkbox "Switch group automatically".
- Select the kind of switching and define the switching times.
- Click on "OK".
For an existing group:
- Select "Smart Home / Groups and Templates" in the user interface.
- Open the settings of an existing group by clicking on the "Edit" button next to the group switch.
- Select the kind of switching and define the switching times.
- Click on "OK".
Instructions: Specifying Switching Times
- Select the "According to Schedule" option.
- On the schedule, click on the status you would like to define for periods ("switched on" or "switched off").
The selected status is displayed with a blue background.
- To define periods using the keyboard, click below the schedule on "Enter period manually".
- To mark periods directly in the schedule, move the mouse cursor to the desired day of the week and time of day. Press the left mouse button.
The selected fifteen minute interval is marked blue (socket/LED lamp on) or white (socket/LED lamp off).
- To save the schedule, click on "OK".
Marking longer periods of time in the schedule
Mark longer periods by holding the mouse button down and moving it to the left, to the right, upward or downward.