Answering Machine
Telephony / Answering Machine / Settings
You can adjust the settings of the FRITZ!Box answering machine to your own needs.
Overview
Overview
The answering machine has various settings for picking up calls, saving messages, remote queries and time control.
Settings
The following settings are available:
| Setting | Function |
|---|---|
| Calls | Specify to which telephone numbers the answering machine should react All of the telephone numbers configured under "Telephony / Own Telephone Numbers" are available, as long as they have not yet been assigned to an answering machine. If you select a message delay (5 to 60 seconds) under "Accept call after", calls will not be answered until this period of time has elapsed. During this time span you can accept calls on the telephone. |
| Operating Mode |
|
| Settings for Recording and Greeting |
|
| Settings for the "Time control" operating mode | For the "Time control" operating mode: Set up time control |
| Further settings (can be displayed or hidden): | |
| Messages |
|
| Remote Playback | Configuring remote playback |
| Deleting an Answering Machine | Delete answering machine and all of the messages on the answering machine |
Operating Mode
Overview
The operating mode specifies whether or not callers can leave messages. You can also configure a schedule for the answering machine here.
Operating Modes
| Operating Mode | Function |
|---|---|
| Record messages | Callers hear a recording and can leave messages. |
| Greeting only | Callers hear a greeting. |
| Time control | In a schedule, you define for each weekday:
|
Configuring your own greetings
Overview
By default, the answering machine uses standard, neutral greetings, but you can also use your own audio files for greetings. The following greetings are available:
- Greeting for the "Record messages" operating mode
- Goodbye message after recording a message (end announcement)
- Greeting for the "Greeting only" operating mode
Requirements
- File format: WAV (8000 Hz; 16 bits; mono) or MP3 (fixed data rate; 128 kbit/s; 44.1 kHz; stereo)
- Length of message: 60 seconds maximum
Instructions: Configuring your own greeting
- Select "Telephony / Answering Machines".
- Only if you have more than one answering machine configured: select an answering machine.
- Click the "Change Greeting" button next to the desired greeting message.
- Enable the option "Own greeting".
- Click "Select File" and select an audio file.
- Click "OK".
Configuring a schedule for time control
Overview
For the "Time control" operating mode you can configure a schedule.
Prerequisites
- The "Time control" option is enabled under "Operating Mode".
Instructions: Setting Up a Schedule
- On the schedule, click on the operation mode for which you would like to specify periods.
The selected operation mode is displayed with a blue background; in this example, "Record Messages":

- To define periods using the keyboard, click on "Enter period manually".
- To mark periods directly in the schedule, move the mouse cursor to the desired day of the week and time of day. Press the left mouse button. The selected fifteen minute interval is marked.
Marking longer periods of time in the schedule
Mark longer periods by holding the mouse button down and moving it to the left, to the right, upward or downward.
Example
Here is an example of a time control schedule:
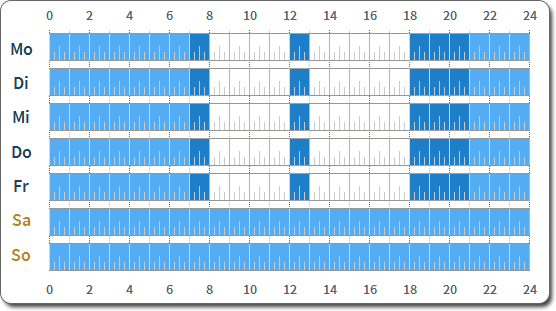
| Color | Operating Mode | Days and times |
|---|---|---|
| light blue | Answering machine enabled, "Greeting only" operating mode | Mo. - Fr. from midnight - 7:00 am and 9:00 pm - midnight, Sa. - So. all day |
| dark blue | Answering machine on, "Record messages" operating mode | Mo. - Fr. from 7:00 - 8:00 am, noon - 1:00 pm and 6:00 - 9:00 pm |
| white | answering machine off | Mo. - Fr. from 8:00 - noon and 1:00 - 6:00 pm |
Use USB storage medium
Overview
You can use a USB storage medium to increase the capacity for recording messages. With a USB storage device the FRITZ!Box can record up to 254 messages from callers.
Instructions: Configuring USB storage
The answering machine settings are stored on the USB storage medium as well. If you remove the USB storage medium from the FRITZ!Box, the settings will no longer be available in the FRITZ!Box.
- Connect the USB storage device to the FRITZ!Box.
- Enable the "Use USB storage device to increase recording capacity" checkbox.
- Click on "OK".
Configuring remote playback
Overview
If remote playback is enabled and the answering machine is switched on (enabled), you can check the answering machine from another telephone line.
Instructions: Setting up remote playback
- Enable the checkbox "Enable remote playback".
- Enter a four-digit remote playback PIN. The characters allowed are the numerals 0 - 9. The PIN 0000 is not allowed.
- Click on "OK".
Instructions: Listening to the answering machine via remote playback
- Call your telephone line.
- When the answering machine answers: Press the * key on the telephone (star key) and then enter the remote playback PIN.
- Follow the voice menu.